To mark the 13th! Anniversary of ann wood handmade I’ve chosen an image from each year to share.
2019 – 2006 – an image from each year:


And buddy. The very first post. All the way back in 2006.

To mark the 13th! Anniversary of ann wood handmade I’ve chosen an image from each year to share.
And buddy. The very first post. All the way back in 2006.


I love seeing what you make with ann wood patterns, the details you invent, the stories you create and share.

This enchanted paper mache ship is by Tierney Barden. I love it, the image makes me think of Narnia. And More gorgeous ships by floratwigg and Sharon.


The bed and blue doll are by Melanie. She is creating a whole world for that mysterious blue tiny doll.
From Melanie: “making this, I thought my heart was going to explode!! “
I so get that feeling and I love everything about this, the joy in creating it is unmistakable and beautiful. I’m looking forward to more of that blue doll’s tiny world. Also be sure to checkout her needle book, the brilliance of it can not be contained in a photo – the little book is filled with ideas, imagination and inspiration. Check out this video.
Find the tiny doll pattern here, and the hearth tutorial here.

Darling miniature china made by Carolyn using this paper clay tutorial.

Bunnies and laundry!! Created by Rachel. The bodies and clothes are the tiny rag doll pattern and the bunny heads are her own.
And tiny rag doll has had a baby!! The dolls below are also by Rachel. She used the doll and wardrobe patterns as well as the tiny hat tutorial. That baby is all her. Such beautiful work.


And more dolls with sweet details added – a little lady by @onbaycreek and a birdwatching boy by annette.


Perfect little toadstools by Randeen and Stella and Summer – made from the little mushroom pattern.


Dastardly owls by Erin, Wendy and Joyce.
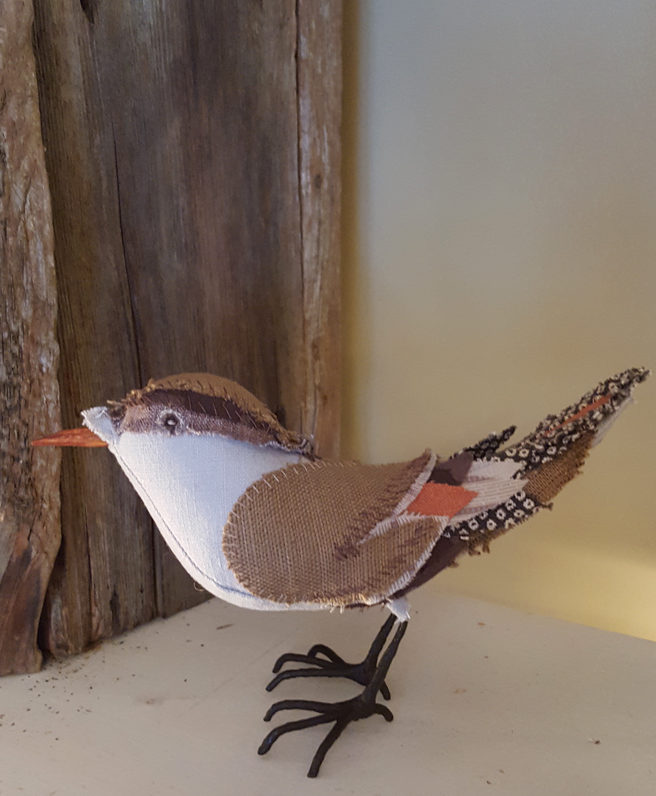


Gorgeous birds by Suzanne and Yvonne and Deb.

Super sweet and pink! wooly squirrel by Beth (forest folk pattern).


Hello little pirate! These are all made from the free very nice mice pattern the pirate is by Beth, the little gray mouse is by Bushra and the bunnies are made by Elizabeth – she added the long ears and fluffy tails to the mouse body.
There were so many photos of wonderful creatures and dolls it was overwhelming and difficult to choose. Please checkout #annwoodhandmade and #annwoodpattern on instagram for more sweet creatures and dolls and marvelous ideas and imaginative details added by the makers.


Spongy and irregular. That’s what I’m looking for, in mushrooms anyway. Strange specimens, just yanked from the earth. I want you to smell the fungal forest air.


The fabric on the mushroom with the puffy and stripey undercap was made using the bleach printing method we talked about a few weeks ago. I did one thing differently this time and made the bleach marks with a paintbrush after sewing and before stuffing
If you’d like to invent your own shapes and sewing patterns good place to start with sculptural/ 3 dimensional sewing (like toadstools) is by experimenting with sewing spheres. Play with the edges, taper one end, experiment with the number of pattern pieces, cut them in half etc. and see what sorts of shapes you can create.

The free sphere template above will help get you started. This mini seed pod is made from the 3 part sphere template (printed much smaller) and elongated a little at one end.

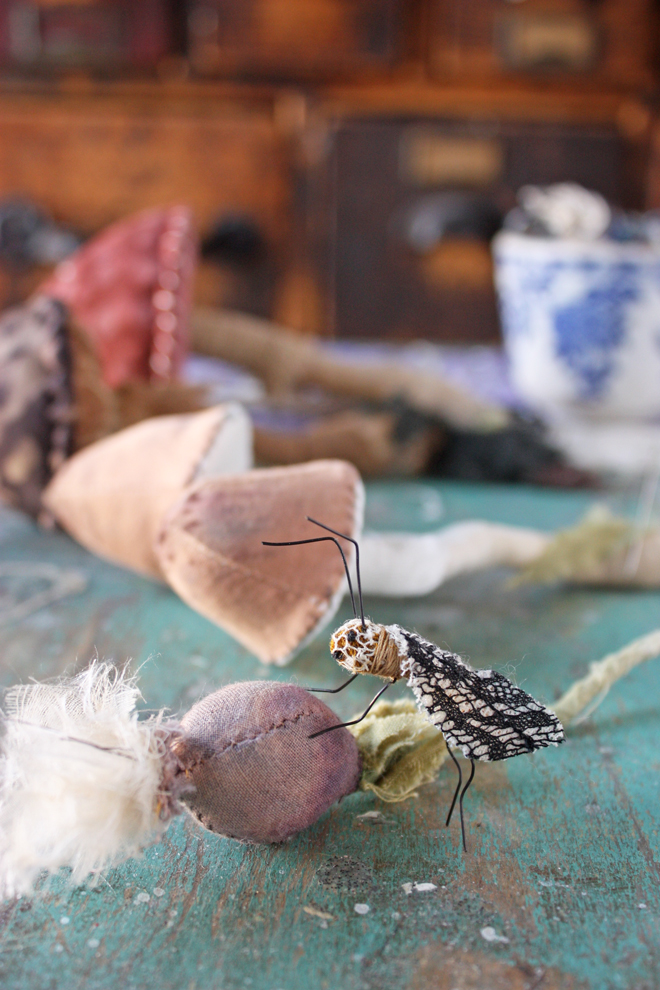
Tiny fly inspected, tiny fly approved.


I’m working on songbirds too – made from antique garment scraps. The indigos are Japanese and the earth tones are mostly linings from edwardian dresses.

What are you making? Have you tried the needle book or the tiny dishes? I’m putting together a post of things made from my patterns and tutorials. You can send photos to me at info at ann wood handmade dot com or tag your photos in instagram with #annwoodpattern.


The original plan was to not have handles. It felt impossible and Miss Thistle didn’t seem like a handle kind of doll anyway, what with the no fingers and all. But once I figured out how to make a cup I had to have the handle. The handle quest was long but the solution is easy and makes a truly awesome tiny handle. Really, it is magic.

The little plates are simple too. In my first (and many) attempts I struggled with getting shapes and edges I liked. Lots and lots of failed tiny plates led me to an easy solution for that too.

Before we talk about how to make the tiny dishes and cups let’s jump ahead to the finishing. Paint your tiny cups and plates and saucers with acrylic paint.
I vote for heart and sweetness over perfection in decorating your miniature china. The more I relaxed the more I liked what was turning up.

You can thin the paint to make washes. The effect of painting it on and wiping it off is nice, so is splattering using a toothbrush.
For little details and lines I use this brush*. It’s handy for lots of things.
And optionally finish each with a coat of nail polish. Using one that is not quite clear (mine has just a hint of shell pink) makes a lovely surface.


You will need:

Double a length of embroidery thread ( I used dmc 8 pearl cotton – you could experiment with other floss or twine as long as it is a natural fiber). Saturate the doubled thread with glue (I used my fingers) and wind it around the end of the pencil as shown. Let this dry completely

When the thread is dry remove it from the pencil and snip off a small section of one curl. Coat the end of the sharpie with a little bit of cornstarch (just a very light dusting – you don’t need much).


She has been speaking to me for a long time. Little whispers of her origins, her tidy house, her hearty ancestors. This is what I know about Miss Thistle.
I’m sure she cooks on an open hearth and has a cozy spot by a window for sewing and correspondence and daydreams and tea.

She tends a medium size garden and keeps chickens and goats and bees. And she has sweet miss-matched china – passed from aunts and grandmothers and friends.
My way into Miss Thistle’s world is the hearth. Your tiny rag doll might need a hearth too.

It’s not hard to make. And before we dive into how I want to tell you about the next Miss Thistle Society project: her mismatched china. I have a trick that makes it pretty easy and spectacularly fun to make her tiny hand-me-down plates and cups. Look for that next week.
This post contains an affiliate link – meaning I get a small commission if you purchase through the link – marked with an *asterisk.

 You probably have most of the things you need for her dishes, except maybe the clay. I use paper clay – this is my brand and *you can get it here (The Miss Thistle Society gets a tiny commission if you purchase through this link). I use it for lots of things but I always buy the small size because it does not store well after opening.
And you will need a hearth. A shape to work on. I made my shape out of foam core and mat board. It’s assembled with hot glue mostly. So many burns… And I made a giant hearth – you don’t need to. A small one is sweet and quick to make.
This tutorial is concerned with making the stone finish but I will offer a couple tips on making your foundation shape.

The easiest thing to do is start with a box (a sturdy corrugated box). The box above is about 6 X 9 inches and 1 and 3/4 inch deep. Mark the opening and use your exacto knife to cut all the way through the lines marked in red and score (just cut the surface of the cardboard) the lines marked white. Fold back the sides to make the inside walls of the hearth. Glue the hearth walls in place and cover the scored areas and edges with making tape.
If you make your own shaped foam core is great – choose white or black.


Whether you build the shape or use a box, re-enforce the corners (inside) with little triangles of mat board glued in. A few in each corner will make everything stable and sturdy.
I’m demonstrating the stone texture on my huge hearth. Cut shapes from grey cardboard and tear shapes from a grey paper egg carton (the flat parts) to create a little variety in texture and edges. Glue them to your structure with elmer’s glue. I made my structure out of black so you could see but it does not matter – white grey or brown is fine.

Cover the entire structure (I left a small section of my hearth un-stoned because I have a wood mantle I want to add). Let the stones dry in place. Read More
