make a travel sewing kit, mending big blow outs and a hexie punch

small cloth book with patches

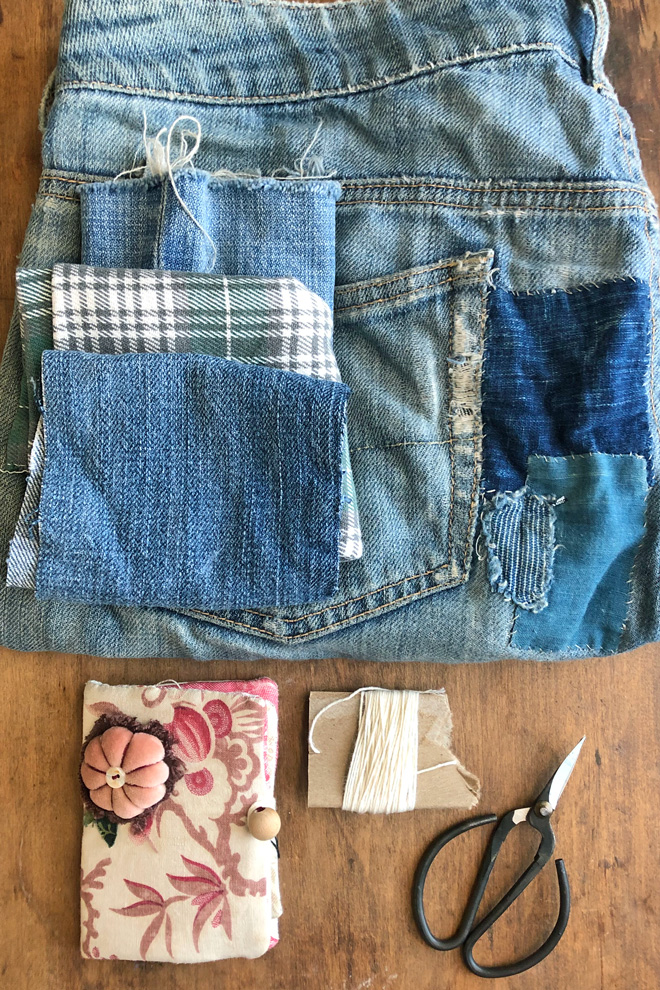
It’s just the right size for a pocket. I made it for a friend who travels, a little book for essentials – like safety pins and bandaids, an emergency tea bag, that sort of thing. There is also a mini sewing kit built in and lots of good wishes for safe and happy travels. I’m sure it is lucky.

cloth book with pockets and pre-threaded sewing needles

carved twig toggle button on fabric book

The little toggle is carved from a twig. I made a notch in the center to grab the thread and stitched it to the edge. The loop is thin black twill tape. The book is made from the needle book sewing pattern using just the the page B and C templates.  The center page has one big pocket and I double sewed the seams so it won’t tear if it get’s over stuffed.

small cloth book with center pocket patch

let’s talk about mending

Not little tears and holes- the major catastrophes like this whole seat blow out. This requires some stabilizing before the sweet patch stuff.

1. Starting with the garment inside out and the tear laid flat and smooth pin a piece of light weight fabric over it. Baste that fabric in place.  Put a magazine or piece of cardboard inside so you don’t  accidentally stitch  the leg or sleeve etc. closed.

2. With the garment right side out use small even stitches all around the the edge of the tear.

trimming excess stabilizing fabric

3. Turn it inside out and trim away the extra.  I didn’t remove the basting stitches because they will mostly get covered but you can if that’s how you roll. Turn right side out and start patching. Having the area stable will save you tons of time in the long run and helps create a smooth, soft and very wearable repair.

patching over a tear in corduroy shorts

I’m still working on these shorts, check out my instagram stories this weekend (@annwood)  for more mending and other recreational sewing including hexies.

 speaking of hexies

*affiliate links below – meaning I get a small commission if you purchase through the links.

die cutter for making hexie papers and a one inch hexie quilt in progress

Did you know this was a thing? I had no idea such a magical device existed until I saw someone using one. I’ve had it for a couple weeks and I love it. Magazine covers are the perfect weight for the punch, it is not effective on anything heavier. Plus I like magazine covers for hexie papers – they hold up well to re-use.  You can find the *one inch hexie paper punch here.

And I use *this mini hole punch. The holes are not essential but they do make it easier to pull the paper out and re-use it.


get the free pin girl sewing pattern here

I’m in full summer mode, I love the expanse of swimming, garden, yard sales and sewing outside that is currently before me. I’m also in full packing mode. Again.  Moving in a few weeks. Let’s think of it as another opportunity to get super organized…

die cutter for making hexie papers and a one inch hexie quilt in progress

Have you tried a hexie punch? Do you have summer mending projects or mending tips to share?  Are you reading something awesome?  Let us know in the comments.

what’s on my worktable : rag doll wardrobe patterns and hexies

hexie quilt progress on my worktable

hexie quilt progress on my worktable

A late spring update on all the things.

Let’s start with hexies : while not at all consistent, I am quite slow. The consistent part is easy to fix : commit to making one every morning, which most often leads to more, you know, once you get going on something like this…

hexie quilt with color transitions in progress

I’m starting to have a vision for the color shifts plus I’ve decided to square off the edges, meaning my progress shape has been an irregular amoeba but I’m shifting into working in straight lines.

And sewing pattern work – a wardrobe for the elegant rag doll is in progress.

Patterns take forever to make. We’d be in real trouble if I didn’t enjoy the process.
The centerpiece of the doll wardrobe will be a versatile dress, a pattern you can add or subtract details from and make a short and long sleeved version – you get the idea.

doll dresses in progress

The construction needs to be simple, easy to make, and I want an option for a fitted look. This is accomplished with pleats and gathers in strategic places. I would totally wear this.

There is another summery tea dress too but this pattern is further along. It’s in the woodshedding stage, I am making tons of them to work out details and make adjustments. After the early muslin drafts I converted the hand drawn patterns to an illustrator file and start tightening things up. I’m pretty close to a final version and as I’m sewing little dresses the pattern starts to write itself, I’m hard in the zone and hear the directions in my head whether I want to or not.

doll dress making on my worktable

Besides the other tea dress I’m thinking of a satchel, slip and pinafore. Maybe some bloomers. She’ll need a coat too  and I’m pretty sure I can make a version of the free felt jacket in her size.

small garden with cedar chest container

A couple other projects on my mind – mending and garden beginnings.

I love everything about  having a tiny garden. Except bugs. The container is a re-purposed cedar chest I got for almost zero dollars last fall. I never really loved it and it was in sever disrepair so I took off the top and planted stuff in it. I suspect it will fall apart by the end of the season but it looks cute now.

What are you up to? Are you making hexies? Are you growing stuff?What would you like to see in the elegant wardrobe?

miniature wood stove diy : new miss thistle society project

doll house doll and stove

Make a miniature wood burning stove for your tiny rag doll. You’ve probably already got everything you need and it’s pretty quick (and super fun) to make.  The stove is made from a TP tube and paper egg carton. 


The little stove is intended for the bedroom of the cardboard cottage I’m making for the tiny rag doll.

What’s more luxurious than a sweet wood burning stove in your bed room? I can think of nothing.

get the tiny rag doll pattern here


Before we dive into the construction steps lets talk a little about finishing. Let the glue dry completely before painting or you will be sad…  And speaking of glue, I do prefer wood glue for this, it sets up fast.

find more miss thistle society  projects here

Use a paint that has a pretty flat finish – lots of craft paints do. I added little bits of lace to mimic the ornate details of antique wood stoves – you could go bananas with this idea and add all sorts of decorations. During the lengthy research and development phase of this project I looked at tons of antique wood stoves, there are lots of fascinating shapes and details you could play with.

Apply 2 or three coats rather than a single heavy coat and let them dry in between coats. Use a stiff brush and work the paint into the lace details. For even more detail you can rub a graphite stick over the textures and edges to highlight them. I also like to draw details and decorations with a pencil.

Tools and Materials:

  • paper egg carton
  • corrugated cardboard
  • 1 TP roll tube
  • toothpick
  • masking tape
  • small lace trim
  • wood glue (you can use white glue but I prefer wood glue)
  • scissors
  • manicure scissors are helpful
  • black paint

1. Gather your materials for building the shape – corrugated cardboard, one TP roll and an egg carton.

2. Measure 1 and 3/4 inches from one end of the TP roll and mark a line.  Cut as shown- make a straight cut from the longer side to the line and then around the line.

3.  Cut the roll in half – marked in red.

4.  The 1 and 3/4 inch tube will be the center of the stove and the remaining pieces will become the pipe.

5. Pull off a couple pieces of masking tape so they are handy. Roll the two piece into tubes about 1/2 inch in diameter.

6. Glue the edge down and secure with masking tape

7.  Cut 2 – 2 inch squares of corrugated cardboard.

8. Apply wood glue to one end of the tube.

9. Glue the tube to one of the cardboard squares. Squeeze the tube a little to make it as round as possible if necessary and press down.

10. Wipe away the excess glue with your finger.

11. Repeat for the other end of the tube.

12. Put something for weight on the glued cardboard and tube. Cut out 2 of the egg carton sections.

Read More

imperial cats : experimenting with dolls

Somebody new turned up. Here’s how it happened:

The experimenter in me has been needing some encouragement so I planned a solid chunk of time for messing around last week. I started by looking at Pre Columbian Figures for inspiration (this is something I’ve played with before) then made a bunch of super quick charcoal sketches.

From the drawings I chose a couple shapes to use as templates. An important part of this process for me is to be quick and not linger in decisions or get stuck on overthinking. It’s a yes and process, feeling for ideas and happy accidents, not perfection. Trying stuff.

I know it’s hard to let go of out come, especially when you are sewing, so much time and energy, but what you learn in the process is valuable. One thing really does lead to another, if you let it. I did not love everything I made last last week but it did get my wheels turning.

And the experiment is ongoing (I’m still very much in the middle) and lots of fun. If you feel like trying this you can come up with your own shapes to play with or you can use my templates (I’m nice like that). I’ve got two so far. You can download the cat-ish figure here and the bird-ish shape here.

I find this guy hilarious. He ended up feeling a little bit like a ming dynasty emperor or soldier. (I love ming dynasty imperial portraits – the silhouettes, the details…). There are other shapes to explore in the charcoal sketches I started with, more sparks of ideas and curiosities to investigate but I feel like making a bunch of these right now, a little army. That’s what I’m doing today on this rainy Sunday.

What are you sewing today? How do you experiment? What get’s your wheels turning? Let us know in the comments.


the somewhat weekly newsletter

Do you get my free weekly-ish newsletter? There are tips and tricks, ideas, stuff to try, all the latest news and blogposts, discounts and extra stuff, just for subscribers, delivered mostly on Friday. Pretty much.


the crow sewing pattern

get the pattern

He’s about 9 inches tall and 11 inches from top of head to tip of tail. The pattern has everything you need to make an awesome crow: learn to sew the sculptural shape of his body, carve a beak from a twig, make wire talons and create shimmery layer of feathers.

crow made from black textiles

I used calico for the example crow in the pattern. I like the combination of a sweet traditional print with more realistic details,  sort of celebrating the make believe. The other fabrics, for his feathers, are scraps of garments in different shades of black.

The sheen also varies. Incorporating fabrics that are flat and shiny and satin in the feathers emphasizes the layers. It makes a huge difference and gives crow -ish iridescence and depth.
Thrifted and antique garments are a great source of material for crows. I’ve always loved using really old garments for details. Pleats are particularly useful – you can incorporate them into the feathers for extra interest and dimension. And antique clothes often have mends and other stitch details that add character. The downside of very old garments is they are often fragile but fragile works for feathers since they aren’t part of the structural sewing.

Perhaps my most frequently asked question over the years has been “where do you find antique clothes to work with.” One of my best sources for Edwardian and Victorian clothes is Ebay. In the pattern I share a specific link (resources page) that’s helpful. I look for damaged garments – perfect for cutting up and not too expensive. And I check often – finding great stuff requires persistence.

In the not super old department thrifted suits are great – there’s tons of fabric and the weight and colors are good. Pin stripes would be awesome for a crow.

I took him down to the Henry Whitfield Stone House Museum for his beauty shots. It was the perfect environment.

get the pattern

I hope you make crows!! If you do you can share images on instagram  – please use :  #annwoodpattern or email photos to me at info at ann wood handmade dot com

5 spring project ideas to try

projects - apron, sachets, cleaning cloths herb marker rocks

projects - apron, sachets, cleaning cloths herb marker rocks

Besides being customarily fired up by spring I’m getting ready to move again this summer. It’s a tiny move – upstairs in the same building but still – all the packing of all the things… Again. On the up side it’s going to be the sunniest and biggest place I’ve ever lived in and I’m pretty excited about that. My plants are too. And I get to keep the tiny garden.

Last year was my rookie garden year. I got a late start (after moving in mid June) and weeks in a hurricane dropped a huge tree on it. Many lessons were learned though and I’m excited about getting the full season this year. I find growing anything super exciting. Both of these little projects are in my plans:

1. Herb markersa super sweet and simple idea from the always inspring august wren.

2. Make a harvest/ foraging apronfind a diy here and another here. I have to make it. It’s illegal to have a garden in Connecticut without one.

And of course new, upstairs me will be extremely tidy and perfectly organized at all times. I’ve got a couple projects planned in the cleaning and organizing department that involve using stuff I already have:

3. Cleaning cloths – I’m using a towel I’ve been hauling around for decades and an old sweatshirt combined with cotton and linen scraps. Find a sewing tutorial here.

4. I love this scrap rug idea but I’m not feeling rug size ambition about it. I feel more trivet size ambition about it. It would also make an awesome bag. Again though I think I’ll test drive it at a trivet or place mat size. Find the diy here.

5. You know I love a good smell. These sachets are simple and easy and I love the aesthetic choices made here. The free chicken sewing pattern would also make a great sachet. I’m going to grow some lemon verbena and dry it for filling them. Lemon verbena sachets will be great in upstairs me’s perfectly organized closet.

PS – bonus idea :
I don’t know why this reusable coffee filter idea has never occurred to me before, especially in coffee filter emergencies. So easy.

What spring ideas and projects are you fired up about? Have you got a favorite spring soup?

Let us know  in the comments please.


15 years of blogging

How did 15 years happen?

I gave myself a project on 2006. And it got me moving. So many ideas that had been rolling around in my head started to appear on my work table. It felt like I swallowed a magic productivity pill but it wasn’t magic, one thing really does lead to another, if you let it.

ann wood sketchbook : perfection

The biggest lesson learned in the past 15 years for me is that done really is better than perfect. Done gets you to feedback, done gets you to the next thing and the next thing etc.. My favorite posts are all about tricking myself into doing things, fighting with the voice that says not to try. To celebrate 15 years I’ve gathered some favorites.

when it all goes wrong :  fling your soul upon the gloom

when you’re searching for ideas : 30 minute figures

when you’re really, really stuck : harnessing the power of your curiosity to get unstuck

when you just can’t get started : overcoming obstacles

dealing with distraction :  building the focus muscle


What keeps you moving? How do you get unstuck? 

Tell us in the comments and as always thanks for showing up!

ann

5 things bringing me joy this week

March sure does have a sensation. And it’s not even technically here yet. But the days are already gloriously longer and blustery.  In addition to spring seeming like a real possibility here are a few more things that are bringing me joy right now:

1. Recreational ironing.  Which led to recreational sorting. Which led to the next item on the list.

2. Making to-go sewing projects. Way ahead of time. So far I have color coordinated hexies, tiny doll clothes, and lots of mending (one of my favorite road projects).  Pro tip: medium gray thread is super handy for travel sewing. Color-wise it works with most things and it’s way easier just to bring one color.

The most urgent mending project is the eternal shorts. They started as pants and have been on the job for 20 plus years.

Making a bunch of projects completely organized ahead of time makes me feel like an overachiever. I can just grab whichever one I like to take to the park or the beach or for the train. And I’m not done yet, I’d love to have a whole summer of projects, lined up and ready to go.

If you need project bags find a sweet bag tutorial here and a needle book is super handy too – find the pattern here (and the little flower pin cushion on the needle book above here – you can make it in about 3 minutes.).

little bird sewing pattern


3. Birds in the world – A customer sent me some amazing images this week of the library she created for the birds she made with the little bird sewing pattern.

Everything about it is detailed and delightful. So full of joy.

From the maker Jennifer : “I have become an expert maker of tiny books! Many are the same books that I have in my own bookcase, including a full set of Nancy Drew mysteries that match the ones I received for Christmas when I was eight years old. Now, I’ve been making tiny plants out of things in my recycling bin, so they may have a garden soon.”

 4. Plants and pottery. Two things I can’t get enough of. And they work well together. I’m propagating new plants from cuttings and making pots for them.

5. Working on the tiny rag doll world.  I decided to downsize her hearth. The original one was huge and ended up being overwhelming for the house – functionally, spiritually and aesthetically.  The new mini one feels right and  It’s easy to make (cardboard, egg cartons spackle and paint),  there’s a giant tutorial here.

What’s bringing  you joy right now?  What are you sewing for spring? Do you secretly love to iron?