Category: how to

easy to make rag doll shoes : a free tutorial

doll shoe tutorial

doll shoe diy

Easy to make and elegant. I love an expressive foot. Who doesn’t. Most of the dolls I make wear shoes,  even when they are otherwise nude,  and I usually sew them on like the elegant slippers above.

felt doll shoe diy

elegant rag doll sewing pattern


If you prefer something removable  you can make these sweet felt lace up shoes. Both are easy and will work for any doll with a simple, straight rag doll foot. I’ll show you how to make the stitched on shoe first.

Get the complete elegant rag doll sewing pattern here.

stitched on doll shoes

Trace your doll’s feet onto doubled fabric (I’m using light cotton). Trace about 1/8 of an inch from the edge of the foot.

Stitch along the lines.  You can stitch by hand or machine but I think machine is better for this. Either way use very small stitches.

rag doll shoe tutorial

Cut out each shoe leaving a small seam allowance.

Clip notches around the toes.

Cut a slit down the middle – a little more than half way –  on one side  of each shoe. Turn them right side out.

doll shoe how to

Place the foot in the shoe and tuck each front side in.

easy to make doll shoe

Begin to whip stitch the folded edge of the shoe to the foot.  At the center make several neat little stitches close together to cover the bit of little raw edge at the center of the V.  You could also use a decorative stitch (like blanket stitch) and embroidery thread  here  to attach the shoe to the foot if you would like an extra fancy slipper.

Read More

4 spring ideas to try

4 spring craft ideas

4 spring ideas to try

I’ve gathered a few sweet spring projects to share with you:

1. Stitch up some paper treat packages. I may have shared this idea with you before. I love it. Quick and delightful. Find the paper bunnies on the Kreative blog.

2. Nana Company has lots of great tutorials including this basket. I love her fabric choices. The raw linen and eyelet trim are simple and perfect.

3. Or stitch this bunny basket for somebody little. It’s made from an old sweater. Adorable.

4. Make a fabric egg (or a bunch!) – Retro Mama has a pattern and full tutorial.

handmade felt bunnies

very nice mice pattern And if you’ve got the very nice mice pattern you can add some long ears for bunnies. The sweet parade is by Elizabeth.

shop news:

So many paper cuts… But I love making packages.  Lot’s of happy snail mail is on the way.

ann wood handmade packages


the somewhat weekly newsletter

Do you get my free weekly-ish newsletter? There are tips and tricks, ideas, stuff to try, all the latest news and blogposts and extra stuff, just for subscribers, delivered mostly on Friday. Pretty much.


little doll pants : a free sewing pattern

doll pants hand sewing project

The little pants are very, very easy and quick and could be resized to fit all sorts of dolls. It’s a fun hand sewing project or if you like you can sew them on the machine.  In case you want to make one million pairs of tiny pants.

doll clothes diy - pants

He looks so happy! Happy to be getting pants. Little pants, just for him. It’s time to make the lambs and get pants on them. I’ve made you a simple pattern for little pants. The lamb is made from the mr. socks sewing pattern with these modifications. Mr. socks could wear pants too if he felt like it (you know how cats are…) but you would need to leave an opening in the back seam to accommodate his tail.

doll pants sewing pattern

free doll pants sewing pattern

doll pants sewing pattern

Click here to download the template.

You will also need – cotton, a basic hand sewing kit, embroidery thread and needle and a little button.

doll pants diy

Cut 2 pants pieces, cut the top and bottom edges with pinking shears. Mark the seam lines lightly on one piece, pin right sides together and sew just the curved seams.

doll pants tutorial

Open the pants so the curved seams you just sewed are in the center. Pin the legs together and sew the straight leg seams.Trim the leg seam allowance with pinking shears.

doll clothes sewing tutorial

Fold the top edge over about 1/4 inch (try the pants on your doll for a perfect fit). Stitch the folded over top with small neat stitches. Fold up the leg bottoms and hem.

doll pants sewing tutorial

Add a draw string of embroidery thread – stitch through the top folded edge – leave the ends hanging. Add a button in the center. Pull the strings to gather and wind around the button clockwise to hold. You’ve got little pants!

doll clothes hand sewing project

Wearing pants and feeling good about it.

lamb in pants

Add the free felt jacket and free felt hat patterns (larger sizes for both) and you have a fully outfitted lamb!

Do you get my free weekly-ish newsletter? When you subscribe you can download the deluxe pants template with instructions.

miniature dish tutorial : make tiny teacups and plates

doll house dish tutorial

doll house dishes diy

The original plan was to not have handles. It felt impossible and Miss Thistle didn’t seem like a handle kind of doll anyway, what with the no fingers and all.  But once I figured out how to make a cup I had to have the handle. The handle quest was long but the solution is easy and makes a truly awesome tiny handle. Really, it is magic.

doll dishes diy

The little plates are simple too. In my first (and many) attempts I struggled with getting shapes and edges I liked. Lots and lots of failed tiny plates led me to an easy solution for that too.

revelations:

  • it’s easier to cut paper clay after it dries a little
  • octagons are much easier than circles
  • at this very moment your house is full of things that will stamp adorable patterns on tiny plates – soon you will be looking at the bottoms of everything…

miniature china tutorial

Before we talk about how to make the tiny dishes and cups let’s jump ahead to the finishing.  Paint your tiny cups and plates and saucers with acrylic paint. 

I vote for heart and sweetness over perfection in decorating your miniature china. The more I relaxed the more I liked what was turning up.


doll house dishes diy

*Some links are are affiliate links – meaning I get a tiny commission if you purchase through the link – they are marked with an astirisk *

You can thin the paint to make washes. The effect of painting it on and wiping it off is nice, so is splattering using a toothbrush.

For little details and lines I use this brush*.  It’s handy for lots of things.

And  optionally finish each with a coat of nail polish. Using one that is not quite clear  (mine has just a hint of shell pink) makes a  lovely surface.

doll house dishes diy

doll house ideas

doll house dishes diy

doll dish diy

how to make the teacup

You will need:

  • paper clay*
  • a sharpie marker (or a few)
  • white glue
  • embroidery thread (I used – dmc 8 pearl cotton*)
  • scissors
  • paintbrush
  • plastic pencil
  • a little cornstarch
  • sandpaper
  • tooth pick or skewer

tiny teacup diy

Double a length of embroidery thread  ( I used dmc 8 pearl cotton – you could experiment with other floss or twine as long as it is a natural fiber).  Saturate the doubled thread with glue (I used my fingers) and wind it around the end of the pencil as shown. Let this dry completely

miniature teacup diy

When the thread is dry remove it from the pencil and snip off a small section of one curl. Coat the end of the sharpie with a little bit of cornstarch (just a very light dusting – you don’t need much).

Read More

make a miniature stone hearth : the miss thistle society

making a miniature fire[lace form egg cartons

Penelope T. Littles

She has been speaking to me for a long time. Little whispers of her origins, her tidy house, her hearty ancestors.  This is what I know about Miss Thistle.

I’m sure she cooks on an open hearth and has a cozy spot by a window for sewing and correspondence and daydreams and tea.

Thistle P. Littles, Green Valley. Morning, Mountain Shadow

She tends a medium size garden and keeps chickens and goats and bees. And she has sweet miss-matched china – passed from aunts and grandmothers and friends.

My way into Miss Thistle’s world is the hearth. Your tiny rag doll might need a hearth too.

miniature stone hearth tutorial

It’s not hard to make. And before we dive into how I want to tell you about the next Miss Thistle Society project: her mismatched china. I have a trick that makes it pretty easy and spectacularly fun to make her tiny hand-me-down plates and cups. Look for that next week.

doll house plates

paper clayYou probably have most of the things you need for her dishes, except maybe the clay. I use paper clay – this is my brand and you can get it here  (The Miss Thistle Society gets a tiny commission if you purchase through this link).  I use it for lots of things but I always buy the small size because it does not store well after opening.

To make the hearth you will need:

  • paper egg cartons
  • light cardboard
  • elmer’s glue
  • mat board (or a thick cardboard (not corrugated)
  • exacto knife and scissors
  • masking tape
  • spackle (  Find it at any hardware store – I like Fast ‘n Final Lightweight Spackling)
  • craft paint
  • brushes – a variety of sizes
  • toothbrush
  • a sponge and a soft rag
  • fine sand paper

And you will need a hearth. A shape to work on.  I made my shape out of foam core and mat board. It’s assembled with hot glue mostly. So many burns…  And I made a giant hearth – you don’t need to. A small one is sweet and quick to make.

This tutorial is concerned with making the stone finish but I will offer a couple tips on making your foundation shape.

make the hearth opening

The easiest thing to do is start with a box (a sturdy corrugated box).  The box above is about 6 X 9 inches and 1 and 3/4 inch deep.  Mark the opening and use your exacto knife to cut all the way through the lines marked in red and score (just cut the surface of the cardboard) the lines marked white.  Fold back the sides to make the inside walls of the hearth.  Glue the hearth walls in place and cover the scored areas and edges with making tape.

If you make your own shaped foam core is great  – choose white or black.

Whether you build the shape or use a box, re-enforce  the corners (inside) with little triangles of mat board glued in. A few in each corner will make everything stable and sturdy.

I’m demonstrating the stone texture on my huge hearth. Cut shapes from grey cardboard and tear shapes from a grey paper egg carton (the flat parts) to create a little variety in texture and edges. Glue them to your structure with elmer’s glue.  I made my structure out of black so you could see but it does not matter – white grey or brown is fine.

cardboadr stone hearth

Cover the entire structure (I left a small section of my hearth un-stoned because I have a wood mantle I want to add). Let the stones dry in place.  Read More

10 ideas for your scraps

stitched amulets on my work table

stacks of antique fabric scraps

Did you know it is national scrap week? It is not. I made that up. But it should be a thing. I’m making it a thing.  A bag of scraps is food for thought, inspiration, an invitation to happenstance, possibility thinking. It always has been for me.  

I’m in organizing mode here and sorting through pretty much everything but mostly fabric scraps. Choosing what to keep, what to let go of and making what I keep as tidy and orderly as scraps can be. I’m ironing my scraps. I secretly love to iron. Not my clothes, I’m permanently, slightly, comfortably disheveled.  I like to iron scraps. It’s a little ridiculous. Lets call it meditative. Or it could also be called productive procrastination… 

tiny scrap of vintage fabric to patch tiny pants

And sometimes not so productive procrastination. It frequently devolves into spending a lot of time pondering a very small and fabulous scrap. I love this scrap. Now I have to make a tiny pair of pants so I can add this patch to them. And then I have to make a lamb to put in the pants. You see how this goes…

fragment of an antique garment

There are some pieces I can’t call scraps. Some are so exquisite I call them fragments. Something left over from a life with marks from other hands and days.  

10 ideas for your scraps

If you have found your way here it is likely you have scraps too. In celebration of the inaugural scrap festival I’ve collected 10 ideas for your scraps. Let’s start with 3 projects for your most special scraps, your fragments.  

1. sweet needle books –  for needles and ideas and memories.

2. amulets – little stitch experiments I  started making last summer. I begin with no shape in mind, just layering my favorite fragments, experimenting and playing with compositions. Then I trim them and sew a backing. I find the compositions are more interesting if I approach them this way rather than beginning with the shape. I made a little template of the shapes I use for you – you can download that here.  And for cord I usually use this waxed thread (PS I get a tiny commission if you buy it through that link, you can also find it in craft stores).

stitched amulets on my work table

3. ethereal garlands – for the tiniest scraps, the un-sewables, the little whispers you can’t let go of.

4. string quilts- there is a full tutorial here for this quick and easy flip and sew technique for your longish scraps.

5. Once you have pieced together a bunch of scraps you can make a fabric basket – you know what you could put in it?  Scraps.

specks and keeping stitched compostition

6. marvelous fabric compositions – let happenstance be your guide and find inspiration in these stitched pieces by Specks and Keepings. The left-overs from garment sewing are used as is. I love the compositions. There is magic in those accidental shapes and relationships. 

songbird sewing pattern

Check out the sewing pattern and supply shop!


7. french seam pillow cases – for your larger scraps. This is on my domestic sewing list. 

8. jar opener – so clever – made from fabric scraps and rubber shelf liner. 

9. fabric twine – for your tiny scraps. And netflix. And wine. 

10. And finally – it  is illegal to do a blog post about fabric scrap projects without including fabric bunting. Plus I love it – so sweet to make for little folks.

Find 4 more scrap project ideas here. And if you have a project to recommend please leave it in the comments.

 P S – Do you get my free weekly-ish newsletter? There are tips and tricks, ideas, stuff to try, all the latest news and blogposts and extra stuff, just for subscribers, delivered mostly on Friday. Pretty much.

ann wood : stitch expeiments and stacks of antique scraps

the world’s sweetest needle book : a free sewing pattern

heart needle book sewing pattern

free heart needle book tutorial

This little book will certainly hold your needles. It could also be a repository for the scraps you can’t part with. It could tell a story, mark an occasion, like a birth or anniversary, or be a sort of travel journal, the pages filled with little things found along the way and saved.

needle book and tiny rag doll night gown

I always travel with small sewing and it is always a mess of ziplock bags and other aesthetically unappealing containers with sharp things poking out of them. This started as a practical project and turned into a whole other thing.

I made this needle book for future me. Future me is the sort of person who is packed a week before travel, has extra light bulbs and never runs out of toilet paper.

needle book made from scraps

needle book ideas

I’m in love with my little needle book and plan to take it pretty much everywhere for the rest of my life. There are more of these books in my future, for needles and ideas and memories. It is good winter evening sewing.

needle book : free sewing pattern

pin it for later

I’ve put together a tutorial for you below. And subscribers will have a link to a pdf download emailed to them.

You will need a basic sewing kit and the templates.

download the templates

materials :

  • cotton or light linen 
  • scraps for details
  • matching and contrasting thread
  • button
  • embroidery thread
  • batting or felt
  • light weight cardboard
  • ribbon
  • gluestick

patch and appliques : needle book pages

Cut out two each of the A, B, C and heart pattern pieces. One side of A will be your cover page. Add patches, embroidery, appliqués, and other details to your pages. Also cut out 2 cardboard support pieces from light weight cardboard ( a cereal box is great). Use a glue stick to glue the cardboard to pieces of batting or felt and cut out.

Note: Piecing fabric together before cutting the pattern shapes creates a nice variety in the pages.

needle book : ribbon latch

Cut a 3 and 1/2 inch length of ribbon or trim and fold in half. With the right side of the cover fabric facing you pin the folded ribbon to the center of the left side. The folded edge should extend 1 and 1/4 inches from the seam line.  I’m using 1/4 inch cotton twill tape.

needle book_tutorial : seam lines

Pin The A, B, C and heart pieces with the right sides together and stitch the seam lines. Leave a small section on each open for turning. Be sure that the opening on A is large enough to insert the cardboard supports. Clip off the corners of the rectangles close to the seam. Clip the bottom point of the heart and clip notches around the curves at the top and at the center.

needle book tutorial : stitch pages

Turn your sewn and clipped pieces right side out. Use a chopstick or similar to push the corners and curves all the way out.  Add any additional appliqué or other details.

needle book tutorial : insert support

Insert the cardboard and batting pieces into the cover page. The batting side should be facing the inside and the cardboard facing the outside cover.  Push the cardboard all the way to each side, there should be an empty space between them. Leave the cover open at the bottom.

Read More

printing fabric with bleach for stitched mushrooms

The quest for the perfect organic dot fabric for toadstools is never ending, I’m always on the look out for fungal feeling dots, speckles and marks in general and I’m super particular. Shopping in LA a few weeks ago there was lots of nice batik stuff that was close but no cigar. I described my dream fabric to my friend Molly and she said “dude you could totally make that”. That is such a good attitude. Yesterday I experimented a little. And dude, I can totally make that, so can you.

making marks on cotton fabric with bleach

Gather some cotton fabric, bleach, wax paper and tools for mark making. I tried all sorts of things, rubber stamps, pallet knives, brushes, straws, cardboard, spools, on and on. Also put on an apron and some gloves and do this somewhere very well ventilated or outside.

marking with bleach on fabric using a pencil eraser

I had one little dish of straight up bleach (you just need a little) and another diluted about 2 parts bleach to one part water. I put wax paper under the fabric and started making marks. My favorite tools ended up being a pencil eraser, putty knife, a stiff bristle brush, a toothbrush for splattering and a little spool that I glued a piece of wool felt to one end of. A cork would have been good too – just thought of it.

spool with wool felt glued to one end for bleach printing

cotton fabrics printed with bleach for making fabric toadstools

The marks take a moment to begin to “develop”. I let most of the fabric sit for about 20 minutes before rinsing. I have googled/pinterested around and there are all sorts of interesting things you can do with this technique and you can get pretty fancy about it. Find a great tutorial here and another here. 

toadstools made from fabric

toadstools made from fabric, brown and red with spots

little mushroom sewing pattern


find the mushroom sewing pattern here

I love how they turned out, the bleach prints are so perfect for little fungi and there are endless things you could experiment with to make marks.


the somewhat weekly newsletter

Do you get my free weekly-ish newsletter? There are tips and tricks, ideas, stuff to try, all the latest news and blogposts and extra stuff, just for subscribers, delivered mostly on Friday. Pretty much.


doll making tips and tricks

dampening the fabric before stuffing a doll

One of the challenges in tiny rag doll sewing is getting a smooth neck. It is challenging when sewing any doll that has a torso and head as one piece, the stuffing wants to sneak out of the narrow part. I always recommend wool stuffing and that helps but stuffing still escapes sometimes. This past week I came across a great post on stuffing small dolls by Beth, author of By Hook, By Hand, that includes this genius tip for getting a smooth result, particularly in the neck. Spray a little water on the fabric before you stuff.
dampening the fabric before stuffing a doll

I gave it a try this week and the result is marvelous. It’s so simple. Also I was impatient so I used a blow dryer to speed things up after I stuffed, not sure if that made a difference or not.

adding stuffing to the doll torso

I stuff most of my figures, owls, songbirds etc. as firmly as I can but rag dolls are different. I like rag dolls to be stuffed just enough to completely fill out the shape but not too firmly.

moving stuffing inside a rag doll with a needle

Sculpting from the outside with a needle helps refine the shape too – I mean moving stuffing into little cavities with a needle from the outside after a doll is stuffed and closed. I almost always do this with any stuffed thing I make. And I find it easier to feel the areas that need to be filled in more than looking for them.

tiny rag doll with a shawl and satchel

While we are on the subject of tiny dolls, find the easy way to turn tiny parts here and tips for hiding knots here.

onward,

ann

PS – the songbird print pattern is back in stock and ready to ship

the songbird pattern is in the shop and a free tutorial : how to make a realistic bird foot

sewing pattern for a textile songbird

The songbird PDF pattern is in the shop.

Get the PDF digital pattern here and the booklet version here.

It has more than 100 color photos and detailed instructions.  You need basic sewing skills and some patience if you are a beginner.

stitched songbird in a tree

textile songbird in prospect park

hand stitched songbird - back

And to celebrate the instructions for making a realistic bird leg are below. I hope you make songbirds!

How to make a realistic bird leg with wire:

You can use any gauge wire you like, I think that 19 gauge soft annealed wire is the easiest to work with and provides enough stability for the legs. You can build up the thickness of the legs and feet by adding additional layers of floral tape.

how to make a realistic bird leg - step 1

1. Gather the wire, floral tape, hammer, pliers and cutters, ruler and a surface to hammer on, I’m using a little anvil but any very hard surface will do.
Cut 2 –  12 inch lengths of wire.

how to make a bird leg - step 2     how to make a realistic bird leg - step 3    2. Hold the wire with the pliers 1 and 1/2 inches from one end.
3. Bend the wire forming a loop.

how to make a realistic bird leg - step 4     how to make a realistic bird leg - step 5
4. Hold the loop just past where the wire crosses with the pliers. Bend the long end of the wire so it is perpendicular to the loop.
5. Wrap the long end of the wire around the short end behind the loop. Wrap as tightly as you can, keeping you fingers very close to the wrapping.

how to make a realistic bird leg - step 6     how to make a realistic bird leg - step 6
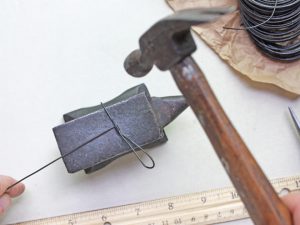
6. Place the wire on a hard surface and tap firmly with the hammer to flatten the wire wrapping. This will help the wrap hold in the next step.
7. Use wire cutters to snip the loop in the middle.

Read More

4 scrap projects to try and a peek at the next two patterns

craft projects made from scraps

craft projects made from scraps

Little projects, for your little bits of fabric:

1. Charming little houses by retro mama. So sweet! And I love her fabric combinations, the natural linen and bright prints. The full pattern and tutorial are both detailed and excellent and you can find them right here.

2. Fabric wrapped hangers. I’m happiest when I have busy hands. Things like paper mache that occupy my hands and relax my mind. Good thinking projects. I also like hangers that things don’t fall off of.

3. For your tiniest scraps darling little flags with a secret ingredient. Perfect for your paper castles and cupcakes and maybe paper mache boats?

4. Paper piecing is perfect summer sewing, something that travels well, beach sewing. This tutorial is great.

And pattern news:

Update 1/25/2019  – both of the sewing pattern below are complete and in the shop.


songbird pattern progress

The pdf version of the songbird pattern is just about ready to go. To drive myself crazy I’ve also been working on the print version at the same time and that will be right behind it. It has been a giant undertaking.

paper mache ship pattern progress

The paper mache ship pattern is at the printer as we speak. I’m picking it up next Monday. So  pleased to have it in print. It won’t be in the shop for a couple weeks because I’ll be traveling and teaching.

squam art fair

When I’m back I’ll turn it into a kit too. I am bringing the ship print patterns (and some ships) to Squam with me. Come say hi at the art fair next Saturday night, it’s such fun, there are twinkle lights and beer.

an entirely satisfying activity involving scraps

lace scrap spools

garlands made from lace scraps

All you need are scraps. And a sewing machine. It is the kind of thing you could lose yourself in, the next thing you know hours have gone by and there are miles of it. It’s a meandering process and an invitation to happy accidents, there are no mistakes, it is not careful (except keeping your fingers away from the needle) and there is no planning. The perfect thing if you are feeling the need for something spontaneous. Just start and keep adding stuff.

garlands made form little scraps of fabric and lace

My approach was pretty bare bones and I had lots of fun. What is your scrap situation like? I’ve got tons and lots of it very small.  I dumped the whole thing out and started pulling out the tiniest scraps, the un-sewables, the little whispers I can’t let go of.

 garlands of scrap lace

Start with one piece, add another and another, machine stitching through the whole thing, sometimes bunching or curving the little pieces. I can’t stop. And they don’t need to be lace, I’ve got cotton scraps too and I’ll try those next.  And you can add other stuff and get super intricate and detailed – find a tutorial here.

You could use the garlands for packages or hang them (maybe with some twinkle lights and paper mache ships) or stitch them onto doll clothes or your clothes or make a crown for somebody little.

I made a mini one  to use as a roiling sea for this little boat.  Find the free mouse pattern here and the free  little boat pattern here.

very nice mice free sewing pattern